Thinking about construction
Each construction has advantages and disadvantages. The children's tricycle has a direct drive, which means that pedals and cranks are attached to the wheel. This is a very simple construction, but there is also a big disadvantage. Turning the crankset once, means turning the wheel once. When you gain speed, the wheels turn faster than the legs can keep up with. For this reason, the front wheel of the first bicycles grew in the nineteenth century. You also had to steer and brake with that frontwheel! With the introduction of chain drive, the wheel was able to turn faster than the pedals. The drive moved to the rear and steering remained the task of the front wheel. It was very important that the seating position was lowered and the rider could get both feet on the ground.
7.50
10.53
9.49
7.16
7.15
4.13
The design phase is the most important moment in the construction of a new bicycle. Most of the problems that arise during construction can be traced back to poor thinking in that phase! Personal preferences for certain riding characteristics play an important role. I opt for a relatively large trail; nice and stable, but someone else will qualify such a steering character as slow. Incidentally, it is more annoying if you do not even know what you want!
To start designing, you can measure the dimensions of a bicycle and display them on graph paper (scale 1:10). Now try to draw your own model, whose measurements and angles are realistic. Most of my designs have not progressed further (paper is patient and cheap). If the decision has been made to actually build a bicycle, draw a somewhat larger model (1: 5). Especially try to determine the angles and important dimensions. When finished, draw the design in actual size e.g. on one piece of wallpaper. Then check all angles and dimensions again. Continue to work exclusively from that drawing. The carpenter's eye of the craftsman sees deviations of ± 0.5 ° and ± 1mm. Indicate all the brazing parts.
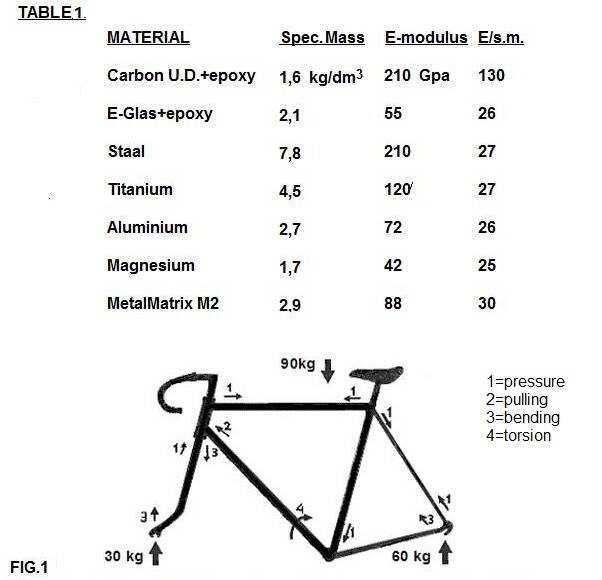
Thinking about constructions and designs requires some knowledge of mechanics. How do the forces act and is the design strong enough to withstand the forces acting on it? In FIG.1 we see the combination of forces acting on a men's frame (diamond frame). The static load, 10 kg bike and 80 kg rider, is small compared to the dynamic forces. When a driver rushes through a pothole, peak loads are created, which are 2 to 3X higher! The frame must be able to tolerate this: it shouldn't even pass the shocks to the rider. But the rider cannot exert any forces on a rubber frame! The frame is the connecting element between the parts. It should be as strong as possible and stiff enough. A tourist has different requirements than the racer.
A bicycle frame must be so stiff that the driving forces of a strong rider can be transferred without losses. It should be so flexible that a rider can cycle on the cobblestones for a day without pain in his wrists. These properties are difficult to combine; usually rigid frames are “hard”. The completely different structure of composites provides better cushioning. Especially monocoque frames are super stiff yet shock absorbing!
In the early eighties, attempts were made to make the frames as flat as possible to reduce air resistance. This way you create a frame that is very stiff in the vertical plane of the frame and very flexible in the lateral plane. It is hardly possible to sprint with such a frame. In the mid-1980s, lightweight became more important again. The aluminum Vitus bicycles were popular; flexible, but stiff enough for the lighter rider. In the early 1990s, we saw a trend towards increasingly stiffer frames. Because stiffness increases with the cube of the diameter, a smaller wall thickness and a larger diameter are chosen; this makes the frame lighter and stiffer. The comfort of these frames is poor, because metals almost completely transmit the vibrations and shocks from the road surface to the cyclist.
The stiffness is determined by: 1.The rigidity of the frame material. 2.The chosen connection method. 3. The geometry.
ad. 1 The stiffness depends on modulus of elasticity, pipe diameter and wall thickness. TABLE 1 shows that structural stiffness improvement is only possible with carbon fiber. All other materials are relatively nearly as stiff as steel (E / sm). Metal matrix tubes have a slightly higher relative stiffness, but are hardly used.
ad. 2 The stiffness of a frame with the same tube decreases as follows. The stiffest: soldering with lugs (solder sleeves), then welding, lugless soldering, gluing.
ad. 3 With a short wheelbase and steep frame angles, a frame becomes as stiff as possible.
The steel diamond frame has proven itself over time. Yet there is something to criticize in the very large and small frame sizes. In the larger sizes, the top tube could be a bit heavier or oversized; this reduces the risk of shimmies. A lighter top tube is welcome in the small sizes. Be careful about weight savings if you move away from the steel diamond frame (how far can too far go?). The standard main tube for the bicycle frame is 28.6x1.2 (28.6mm outer diameter and 1.2mm wall thickness), but the diamond frame is a proven construction; those who design tandems, recumbents or folding bicycles will have a less ideal distribution of the loads.
The hardware store on the corner usually has low quality steel. This is often referred to as St37 or Fe360. It is cheap and available in many sizes and forms, often as a welded tube (with a seam). Due to the low carbon content, it is easy to use, but the yield strength is low. When deviating from the well-trodden paths in frame construction (recumbent bicycles, etc.), make sure to use common sense and choose safety over lightweight! A minimum of 20x1 (horizontal) and 12x1 (standing) applies to the rear fork. The triangle is a rigid construction; where possible, try to achieve this ideal by placing an extra tube in between.
This not only makes the frame stiffer, but also prevents breakage due to “fatigue”. With a “short wheelbase” recumbent bicycle the bottom bracket is a heavily loaded point. If we kick with the right leg, the pulling force in the chain will counteract the deformation of the tube on which the bracket is attached. When we kick with the left leg, these forces work together!

The forces on our diamond frame are well balanced; this is not always the case for other designs. Let's take a look at an old-fashioned ladies' frame. The pressure forces in the top tube of the racing bike in FIG.1 cancel each other out. This does not work with the ladies bike FIG.2a; the reaction forces of the wheels want to “fold” the frame. As a result, great forces are exerted on the seat tube near the bottom bracket. The higher quality frames have a reinforcement tube pressed in to prevent deformation of the seat tube. Cheap bicycles fail here; just look at old city bikes at the station. The lateral stiffness of these ladies' bikes is lousy. Even if the hubs are fairly free of play, sideways rocking back and forth will make the frame perform a kind of snake dance. With a heavy load on the back, the situation is even worse; as long as we ride straight on, it does not have to cause any problems. However, as soon as we have to react quickly, the inertia of the load will take its revenge due to torsion of the frame. The wheels are now no longer in line, the frame is no longer tracking. If we correct to maintain our balance or to avoid contact with cars, the reaction forces just sweep us in the wrong direction. There is only one good ladies frame: see FIG.2b. In the new generation of city bikes and ladies' bikes, large diameter aluminum tubes are chosen. Here we see constructions like FIG.2c, which Archibald Sharp hoped in 1896 to have permanently put them in the cabinet of curiosities of technical failures (with his book “Bicycles and tricycles”) . The branding of the engineer as designer, or even worse: the designer as an engineer, means that these designs are given another chance. At the junction, the stiffness of the frame is barely greater than that of the main tube, and a frame is as stiff as its weakest cross-section. By opting for crazy large diameters, the frame may even be stiffer than the classic ladies bike; but the thin tubes are superfluous.

All the bad things I've said about the classic ladies' frame are even more true for ladies-ladies tandems. Due to the increase in the wheelbase, the bending moment will increase (moment is force times lever). Due to the flexibility of the frame, steering corrections lead to swaying and danger to human life. Down-under, a tandem must be stiff. In steel, 36x2 or 44x1 works very well. If necessary, the tube may be ovalized in the horizontal direction. A very useful design for a ladies-ladies tandem, consists for the rest of 30x2 tube according to FIG.3a. Of course, a classic gents-gents design is also possible like FIG. 3b. The problem here arises that the rear frame forms a paralellogram. The forces on the frame will lead to a bending moment on the horizontal tubes; this is unfavorable and should be avoided. In construction we often opt for triangulated designs. We solve this here by putting an extra diagonal tube in the rear frame; so we get rigid triangles. Even stiffer is the “marathon” construction, in which this tube also runs to the steering head. The optimum is of course a double marathon version that is very similar to the tandem of FIG.3a with an extra top tube. When building such a tandem, you can replace the heavy 30x2 tube from the DD design with seamless 32x1 tubes; you then get a lighter and stiffer tandem. One of the best changes to my tandems was the step from 28” wheels to 26” ATB wheels. The choice for wider tires also resulted in fewer spoke problems and more comfort as a side effect. Choose tires with a closed center line, which can be inflated to at least 5 bar, otherwise the rolling resistance will be too high!

.
FIG.4c

In recumbent bicycles, the weight distribution between the front and rear wheel is a problem. We make the rough classification: short wheelbase (SWB) with the bottom bracket for the steering head and long wheelbase (LWB) with the steering head in front of the bottom bracket. The Belgian production recumbent bicycle Velerique (FIG.4a) from 1982 was of the first type. The first Dutch production recumbent bicycle Roulandt (1983) was of the last type (FIG.4b).
When designing it must be assumed that the center of gravity is at “ navel height”. Draw a line from this point to the wheelbase. The ratio between the distance to the front and rear wheel indicates the ratio in weight distribution. I think the minimum in front is 25%. This means that the distance from the center of gravity to the front wheel may be a maximum of 3X the distance to the rear wheel; if necessary make the rear fork a little longer. The pressure on the driven wheel should be at least 40, preferably even 50 percent. The front-wheel drive Flevobike FIG.4c often failed when starting on wet roads. The designer Vrielink has devised a city and climbing position, by changing the frame angles, using a rotating cam . This shifts the center of gravity forward and puts more weight on the front wheel.
In recumbent bicycles, the frame of the SWB bicycle can easily be designed in a single large diameter, e.g. in tube 36x2 or tube 35x35x2. Those who want to build lighter should use a thicker thin-walled tube such as 44x1. With an LWB or recumbent tandem this is insufficient, because the bending moment becomes too great due to an increase in the wheelbase. Here we have to opt for even thicker tube, frame constructions with triangles, rivetted frames, or carbon monocoques. The construction method and choice of materials are very important for the design. In many ways, rivetting and building with composites is easier than welding or soldering. Those who have never welded before and want to invest little in tools can opt for rivet joints or composites for these reasons. Both processing modes are very labor intensive!
Designing a rivetted frame requires its own approach. Remember that strength and stiffness should come mainly from “oversize” diameters. Choose to process single tube or U-profiles in the frame. This makes alignment easier: the biggest problem during construction. Good sheet material includes 0.8 mm AlMg3 as used in the “Alleweder” tricycle. The design of composite frames also requires an approach that is tailored to the specific possibilities and difficulties of the material. Mold construction and fiber and resin processing are especially important here. We can really choose free shapes here, like the Lotus bike designed by Mike Burrows, see FIG.4e. Unfortunately, the UCI occasionally declares certain frame shapes invalid.
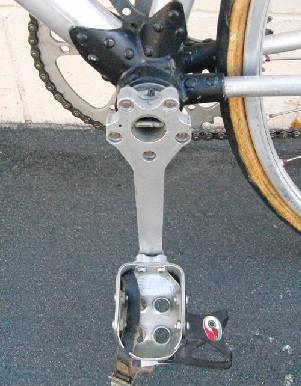
FIG.4d Hi-E rivetted bracket
In the seventies the American Harlan Meyer made very light frames (1200gr.) And parts with riveted and popped aluminum constructions under the name Hi-E, see FIG.4d with own tubes, own lugs, own rims, own hubs, own crankset and pedals etc.
http://www.classicrendezvous.com/USA/Hi_E.htm
His constructions were light, but sometimes too close to the limit.....
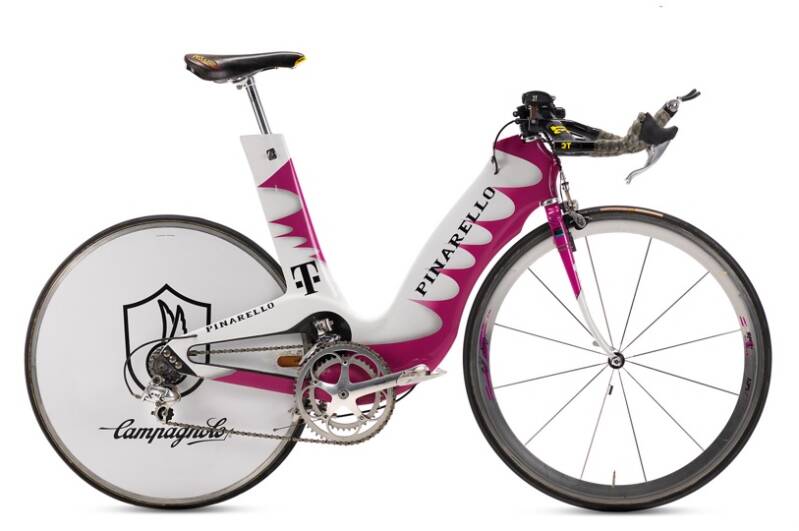
FIG.4f The Pinarello of B. Riis

FIG.4g Cinetica Giotto, a carbon frame from 1989.

FIG.4e The Lotus by Mike Burrows.

FIG.4h Polchlopek; a steel aero, reïnvented 20 years later by Cervelo

FIG.5a Dursley Pedersen 1899
The classic diamond frame was created with the development of "safety" around 1890. Radically different are the designs of the Danish engineer Pedersen (FIG.5a), who from 1897 to 1917 made very beautiful bicycles with tension wires and thin tubes. The man did not get rich, but this design is still used. The first series were built in England and are known as the Dursley Pedersen. From 1904 these were delivered with a gearbox on the rear hub, at an additional cost.
Modern versions of this frame are available from Denmark (the Copenhagen Pedersen). There is even a CX- racer in the USA who uses a Pedersen as his competition bike.
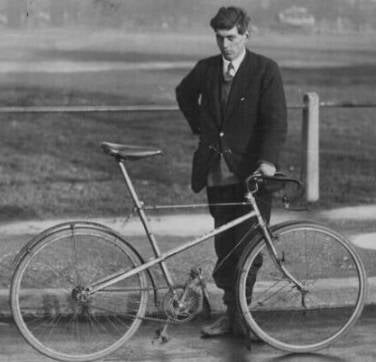
FIG. 5b Early design "tension-frame" racer 1920
Around 1980, the Dutch designer De la Haye made a tension frame bike, which was to be built at Union (FIG.5d). That project never got off the ground and as we can see from the pictures, there were also predecessors in 1920 (FIG.5b) and 1967 (FIG.5c). The patent of Frans De la Haye is applied for on 2/17/81. In 1992 an employment project built a limited number of these frames.

FIG.5c American patent-application 1967
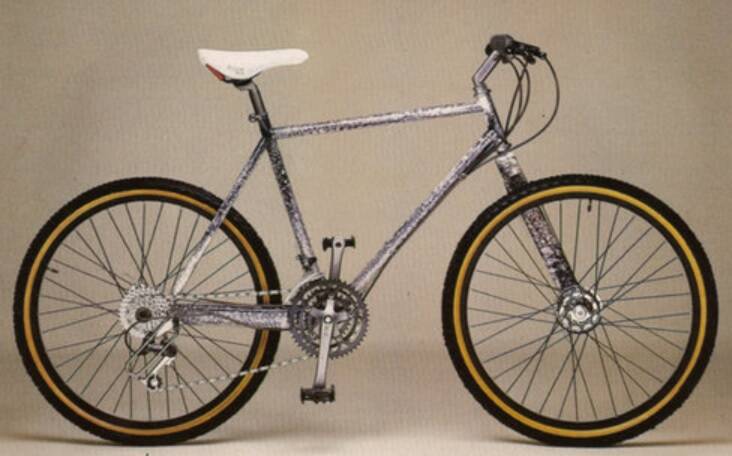
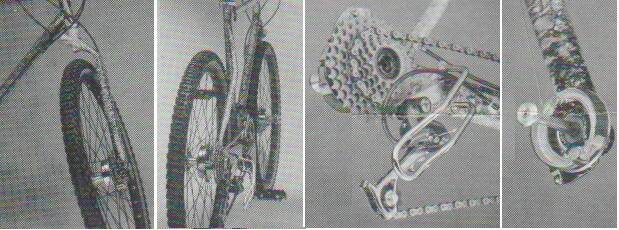
FIG.6.a/b The French Laïti ATB from 1989. No commercial succes, but according to users there are no structural problems with the asymmetric frame, even after 30 years. The rear- and front tubes were heavy ; single sided wheels and integrated drumbrakes. The wheelbolt is M12 quality 12.9
information on Internet
https://www.oldschoolracing.ch/archiv/hi-e/ Something completely different: rivetted alu-frames and parts from the seventies
Old titanium bikes: https://early-titanium-archive.neocities.org/70s
www.m-gineering.nl A Dutch builder.
http://www.richardsachs.com/how-frames-are-made/ Classic bikes by Richard Sachs.
http://www.princeton.edu/~humcomp/bikes/design/desi_3.htm Frame-design
http://bicycledesign.net/ Modern design bikes.
https://www.matweb.com/index.aspx Properties of many materials